
Me and the RaspberryPi /10
As I wrote in a previous post, last Monday I received my Raspberry Pi computer.
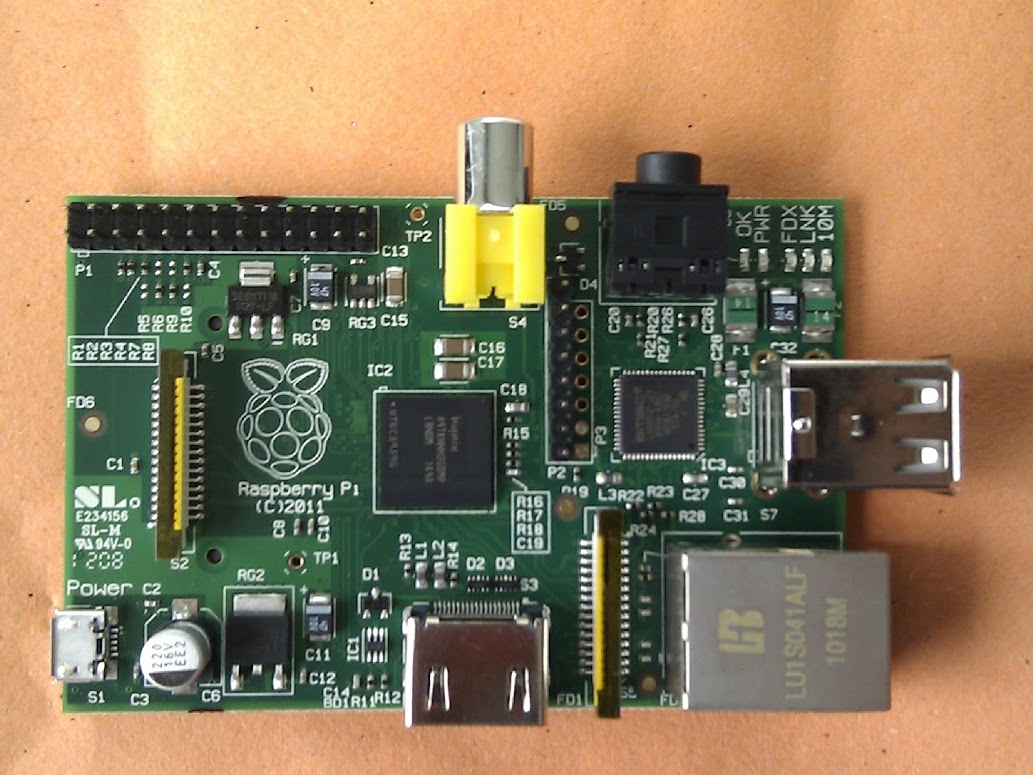
Of course the first think I did was to put it into my case prototype.
I found some little inaccuracies in the (estimated) position of some connectors, and I could eventually see the kind of SD card slot (invisible up to now in all the photos I found on the web: none seems to find the bottom interesting!).
Here is how it looks:


I also fixed the led lightguides to the upper part by hot glue. Even if I correctly positioned the LEDs in the model of the board, there is a little misalignment, partly due to the fact that little interferences (mainly between the bottom and the SD connector) make the board to be not in the right place into the box (it’s a bit shifted towards the usb ports). Furthermore the red (Power) LED is really too bright so that there is some diffusion inside:


Trying to well position the led guides, the light distribution improves a little. Here is how it looks when also the (less bright) green LED (Read/Write card activity) is working:


It is not exactly the best light distribution in the world, but I think that it’s really hard to do better here, because the five LEDs are really small, close each other and far from the cover; furthermore the high brightness of the power led doesn’t help at all.
The second thing I did was… to boot it (using the Debian image downloaded from the Raspberry Pi website). But it has nothing to do with the subject of this article! 😉
The third thing I did was to fix the model of the Raspberry Pi board I did. With the corrected version of the board, the whole assembled 3D model looked the same as the real one: this was proving that things were going well…
Then I quickly fixed the bugs I found as described above. That was also an occasion to make little changes that come into my mind in the past few days. Mainly I didn’t like the holes on the logo, so I wanted to make apertures (even if unnecessary, because really very little heat is produced) in a different way.
Here is the new (and maybe definitive) look:


Now the next step will be to upload this updated model to Shapeways to make a new test prototype. I’m also thinking about the possibility to consider it a Release-Candidate, i.e. to make it available for purchasing to all my impatient fans. 😉
Well, actually the first item, the one blindly designed, is completely usable even if not perfect: so this one should be better.
Let me sleep on it tonight… 😉
.


 Andrea Colangelo
 Dialogando
 La Torre di Babele
 Murofuori

Excellent blog here! Also your web site loads up fast!
What host are you using? Can I get your affiliate link to your host?
I wish my site loaded up as quickly as yours lol
"Mi piace""Mi piace"
Where is the GPIO Cable slot?
"Mi piace""Mi piace"
In this first stage there was no slot. It will be a version (different from the base) available in the “stable” release.
The RC1 version has a pre-shaped zone for GPIO access (https://marcoalici.wordpress.com/2012/05/15/raspberry-pi-case-1-0rc1/#jp-carousel-841), just cut it out to open if necessary.
"Mi piace""Mi piace"
That sounds very encouraging!
As it looks as if it will still be at least a month before I receive my own Raspberry Pi, I think I will wait until you have a copy of RC1 in your hands, just in case you decide to make any small improvements.
It will cost a bit more than I hoped to pay, so I think I would rather wait until you are completely satisfied with the design of your case, and Version 1 is ‘released’.
I am quite sure that it will be worth the wait, and that it will provide the perfect ‘home’ to protect my Pi!
"Mi piace""Mi piace"
benissimo, mi sembra che il case sia ben progettato, allora aspetto (aspettiam) con ansia che tu lo metta in commercio, avrò il mio raspberry a luglio… Ti consiglio di fare presto però, il grosso dei rapberry sta per essere consegnato e in giro i sono altri case, non belli come il tuo a la gente può non voler aspettare…
Facci sapere ciao! G
"Mi piace""Mi piace"
http://www.shapeways.com/model/486999/raspberry_pi_case_1_0rc1.html
http://www.shapeways.com/model/486757/raspberry-pi-case-led-lightguides-1-0rc1.html
(-:
"Mi piace""Mi piace"
Thank you for the update Marco.
Can I ask when you expect to receive your first case from Shapeways of this latest prototype design?
Is it possible that you will then make some more small modifications, before it is finalised?
"Mi piace""Mi piace"
I’ve just ordered it. I think that it will arrive within a week.
I hope that no more modification are necessary, but I can’t exclude little adjustments based on RC1 testing. Anyway the first sample is usable and I’m using it for my RPi.
"Mi piace""Mi piace"
another idea (http://mailpress.org/RaspberryPi00-v2.zip)
"Mi piace""Mi piace"
I wonder if manually painting the surface of led guides in black decrease the light diffusion? You could try covering the long legs with opaque duct tape first to see if it helps.
"Mi piace""Mi piace"
The main problem is the very little distance between LEDs, that doesn’t allow the lightguides to be properly large.
"Mi piace""Mi piace"
When it is available on Shapeways I assume there will also be an option to order one in black, which I think could look very smart indeed!
Hopefully we will see some pictures of the updated design on there soon?
I can’t wait to order one!
"Mi piace""Mi piace"
Yes, black will be an available choice. I’m still working on how to minimize LED diffusion, then I will release it.
Be patient, please! 😉
"Mi piace""Mi piace"
You could simply use heat-shrink sleeving around the light guides, this works to block out the light and could be cut to lenth.
Any idea as to when you could produce low volumes of this case, and a price, I think the design is fantastic.
Regards
Malcolm
"Mi piace""Mi piace"
Hello, i am trying to build my own case (www.mailpress.org/Raspberry_pi.zip)
Could you share any information about measures of the raspberry_pi
Thank you
"Mi piace""Mi piace"
Hi,
I was wondering if you had considered putting bracing in the lid. By this I mean structures hanging behind the connectors (USB, Ethernet, video, etc) to prevent them from being damaged from too much ‘plugging in force’.
I like your design a lot, also that you have included mounting holes. As the device is so light, I thought rubber suction pad feet would be a good way to keep it in place on a table.
"Mi piace""Mi piace"
What conclusion did you reach after you had slept on it, Marco?
You must let us know what you have decided! 🙂
"Mi piace""Mi piace"
Excellent work! Any idea what the final price of the case will be?
"Mi piace""Mi piace"
Overall, VERY nicely done and inspirational! But your example underscores why I will wait to get a Raspberry Pi (someday?) before designing a case for them…
"Mi piace""Mi piace"
It depends on how many time you can spend on the project: if it’s small, you must start early. 😉
"Mi piace""Mi piace"
Yeah, but I would screw something up… and as a former product designer I tend to trust my own measurements off of actual items more than what’s on paper. 😉
"Mi piace""Mi piace"
Me too, but CAD lets you roughly sketch the design and adjust it later just changing dimensions.
"Mi piace""Mi piace"
Well, sure (I’m a SolidWorks and AutoCAD expert) but what I mean is I don’t want to go to the expense of having Shapeways or someone print out a case only to find a critical dimension is off. And with the item in hand I can come up with more ideas anyway.
"Mi piace""Mi piace"